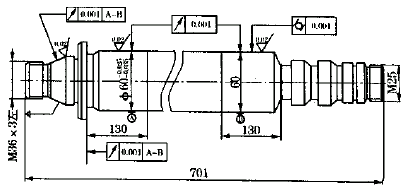
• Special spherical tip for external finishing The spherical body is circular in shape and the spherical body is in contact with the tapered hole. The outer spherical final tip is used to position the workpiece in the top clamp position (as shown in Figure 3). The spherical tip can geometrically ensure that the tip and the tip hole always maintain a circumferential line contact state in the positioning section, and even if the two tip holes have a significant taper error and coaxiality error, the circumferential line contact state is not changed. When the spherical tip is used for positioning, the contact stress distribution of the circular section is uniform, the contact stiffness is significantly improved, and the axial displacement of the ground spindle component due to the contact deformation of the positioning surface is substantially eliminated, thereby significantly improving the positional stability of the spindle rotation axis. The roundness of the outer circumference of the main shaft is greatly improved. Figure 3 spherical top positioning state diagram • Multiple research on the top hole The main outer surface of the precision spindle part (such as the spindle journal surface) is generally processed by multiple steps such as rough grinding, semi-finishing, fine grinding, final grinding (super-fine grinding), and should be processed before each grinding process. The top hole is carefully studied to gradually reduce the surface roughness value of the top hole, improve the shape accuracy and coaxiality of the two tip holes, and achieve the purpose of improving the contact precision between the tip and the tip hole. The precision of the tip hole repair before each grinding process should meet the following requirements: 1 rough grinding outer circle front dressing accuracy: surface roughness Ra 0.63μm or less, with standard tip color inspection, contact area is not less than 60%; 2 half Precision grinding front grinding precision: surface roughness Ra0.32μm, with standard tip color inspection, contact area is not less than 65%; 3 precision grinding outer circle front grinding accuracy: surface roughness Ra0.32μm, working with grinding machine top Coloring inspection, contact area of ​​not less than 75%, and contact at the near end. 4 final grinding outer circle front grinding precision: surface roughness Ra0.32μm, using a special final grinding spherical working tip with abrasive grinding and coloring inspection on the final grinding machine, the contact area is not less than 95%; at the same time should ensure the constant temperature processing conditions (20 ± 1 °C). 3 Conclusion The process test shows that by performing multiple repairs on the top hole and using spherical top grinding before the outer round final grinding, the quality of the top hole can be significantly improved, and the precision of the top positioning can be refined. The spherical tip is easy to manufacture, use and maintain, and the grinding quality is high, so that the contact area can be stabilized to more than 95%, and it is easy to ensure contact at the near end. By adopting the refinement measures of the top positioning accuracy, the precision of the outer circle of the precision spindle parts is obviously improved, and the dispersion range of the roundness error is reduced (can be stabilized within 0.005 mm), which ensures the processing qualification rate of the precision spindle parts. Previous page The commonly used Pipette kits are mainly composed of a pipette and a pipette tip. The pipette tip is a single empty 1000 ul pipette tips,200ul pipette tips,10ul pipette tips,low retention pipette tips Yong Yue Medical Technology(Kunshan) Co.,Ltd , https://www.yonyue.com
(a) Top positioning diagram 
(b) Positioning section contact state diagram
Cavity reservoir; the pipette uses the principle of air displacement and controls the maximum displacement of the piston by rotating a screw with an ultra-fine thread
displacement, and then control the amount of liquid suction. There are the following problems when using the above kit for suction: 1. The suction volume is controlled by the pipette
After the pipette is sterilized or used for a period of time, it is easy to cause "hidden" failures, which cause the operator to be difficult to detect.
The actual suction volume is inaccurate, and it needs to be adjusted frequently, and the operation is cumbersome and time-consuming; 2. To improve the pipetting accuracy, the operator's
The operation requirements are high, and it is easily affected by factors such as the suction speed, the depth of the tip below the liquid level, and the inclination angle of the pipette.
The actual suction volume will be heard; 3. The actual suction volume will be affected because the suction head cover is not tight and leaking, and it will not be easily detected; 4.
When performing experiments that require high accuracy, such as analysis, in the operation of equal volume aspiration of liquids with different densities, the actual
The actual suction volume will be affected by the density itself; 5. In order to improve the accuracy, this type of pipette needs to carry out high
Cost-optimized design results in extremely high pipette costs.